4 Ways To Fix Audio Services Not Responding Windows 10
Audio services is a service that provides sound service to the system. The message that the audio service is not running comes when the audio is not working on our computer.
What can we do to start the audio service?
- Press on the Start menu and then type services. MSC in the Run dialog box.
- See the services that are available and find windows audio and right-click on that and select start.
- Choose the Windows audio properties and change the status to start.
Enable the Windows audio service
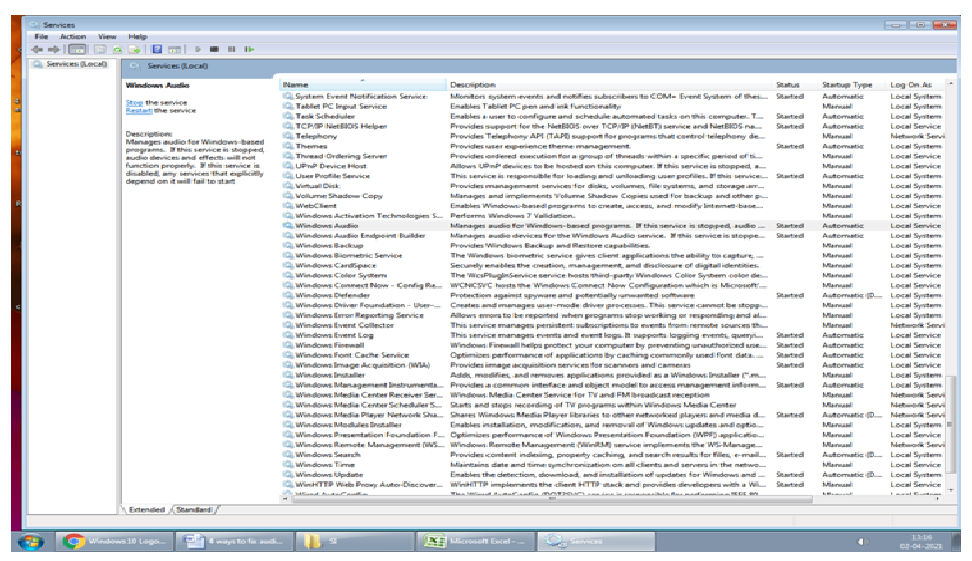
- Choose the Windows computer management tool.To see this tool by pressing Start –> Control Panel –> Administrative tools –> Services.
- See the available services and see “Windows audio” and press on that.
- Right-click on the Windows audio service
- Choose start
- Press run.
Audio Service is not Running in Windows
There are different audio systems available in the market today. The audio services give the service to all those audio systems. But sometimes the audio service is not working properly.
Whenever we see the error message that says, audio services not responding. That error arises when our audio service is not responsive. We need to resolve the problem by correct the audio service then only we use the audio systems.
To Solve Windows 10 The Audio Service Is Not Running
There are several options is there to solve the problem. Below we see those options.
- The Service Windows audio service is restarting.
- To add the services we use the command prompt
- Registry modify: Set the value to the ServiceDll.
- Find the services for audio components
- In the Device manager we need to reinstall the audio driver
- The default sound drivers will be installed.
- Choose the system restore to go to the point where we are in the last saving location.
- In the antivirus we can restore the registry key.
option1:The Service Windows audio service is restarting.
- Click on the start menu then we choose the windows system folder
- We will expand the windows system folder to choose the run to open the run.
- Type services.msc in the Run dialog box and then press ok.
- Choose the windows audio in the available services list
- Press on windows audio and then right-click and select restart.
Once we do all the above steps now we need to check the startup type of windows audio is enabled as automatic in the services list.
If that is done then no need to change anything.
But it is manual or disabled, we need to change to automatic by doing this.Select windows audio, right-click on it–> select properties–> select automatic. Now click apply and ok.
To Add the Services we use the Command Prompt
- Select the start menu and then select the run dialog box. Type cmd in the Run dialog box.
- In the command prompt we need to right-click and select run as administrator
- In the administrator command prompt type net local group administrators / add network space, after this press enter.
- Press enter after we type net local group administrators / add local service
- We need to see some time to complete the commands.
- After doing above all we need to restart the computer.
- Although, you are using a command prompt for managing disks and configuring the system.
- Command prompt is also used to do get the files from hard disks and USB drives.
Find the Services for Audio Components
- Click on the start menu and then select the run dialog box.
- Now enter MSC in the Run dialog box and press enter.
- See the available services in the list and choose windows audio service.
- In the windows audio service we right-click on that and select properties.
- Now choose the dependencies tab.
- Now check the all components inside this service depends on the following system components.
- Check if all components in the above are started and running in the services. MSc in the services list.
- Now we click on windows audio service and right click and choose restart and then restart the system.
The Default Sound Drivers Installing
- Type win + s to open the find in the start menu. Now press “system” in the Run dialog box and choose the first one that gave the result.
- Now choose the Advanced system settings that are available on the left side of the screen.
- Choose the hardware menu and then choose Device installation settings.
- Choose the choice of “No( The system is not working as we imagine)”. Click on save changes and quit. By doing this updating of audio drivers automatically will be disabled
- Click Win + x to open the start then choose “Device Manager” from the given choices.
- In the device manager elaborate the sound, video, and game controllers section. Choose our sound device and choose the uninstall device option.
- See the uninstall driver checkbox to uninstall the audio driver and also we can allow uninstalling the driver.
- After the uninstall process over now press on anywhere in the device manager and right click and choose “Scan for hardware changes”. After that, the system checks the audio hardware and also installs the default driver into the system automatically.
- Once default drivers installed check if there is any difference that happens. Now we restart the system.